1 Front panel
The front is for anything you plug in and pull back out.
1. USB 3.2. Blue inside, the fast one. Flash drives and backup drives.
2. Audio jack. Headphones, earbuds, desk speakers.
3. Clear CMOS pinhole. A service button, not a port. Leave it alone.
4. USB-C. Plugs in either way up. Often carries video too.
5. Power button. A quick press turns it on or puts it to sleep. A ten-second hold forces it off.
6. Power light. Lit means running, dark means off.
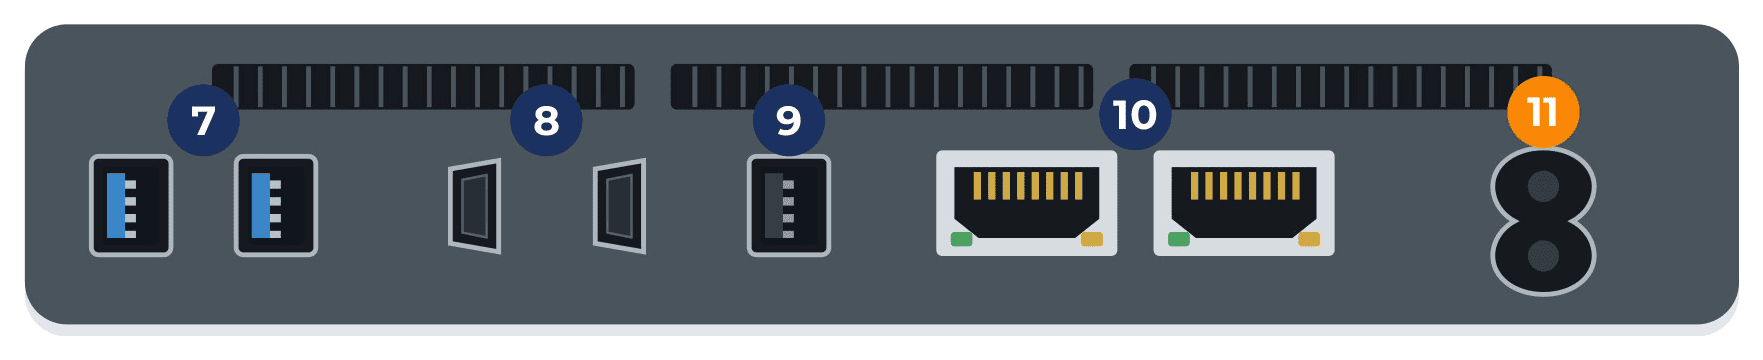
2 Rear panel
The back is for what stays plugged in: screens, keyboard and mouse, the internet cable and power.
7. Two USB 3.2. Printer, webcam, a drive that stays on the desk.
8. Two HDMI. Monitors or a TV, up to 4K at 60 Hz. Two screens, no adapter.
9. USB 2.0. Black inside and slower. Keyboard, mouse, dongles.
10. Two network ports. One cable to the router. Either port works.
11. Power input. Use the adapter it came with. Barrel plugs from laptops and routers look identical and carry different voltage.
3 No picture on the screen?
Work down this list. It’s usually one of these.
Try the other HDMI port. Five seconds, and it’s often the whole fix.
Check the monitor’s input. Use its Source button to match the HDMI you used.
Push both cable ends in firmly. HDMI backs out easily on a light machine.
Dark power light? Reseat the adapter at the wall and at the machine.
Where everything goes
Monitor or TV: either HDMI port on the back.
Keyboard and mouse: the black USB 2.0 port on the back.
Printer, webcam or a desk drive: the blue USB 3.2 ports on the back.
Flash drive or backup drive: the blue USB 3.2 port on the front.
Headphones or speakers: the audio jack on the front.
Internet cable: either network port on the back.
Not sure what goes where?
Bring it in with its cables and adapter. Most jobs are covered by our flat $100 bench fee, and we call before anything costs more. We’ll walk you through it for a small fee.